Thank you for visiting!

Monday, December 12, 2011

Nicole's Mirror Mini Christmas Giveaway

Oh yay!
Nicole of Nicole's Mirror beauty blog is having a giveaway for Christmas.
Great prizes to be won so... give it a shot! I know I did!
All you have to do is follow her on her blog and Facebook.
Easy peasy.

Check out the giveaway on her blog --> Nicole's Mirror Mini Christmas Giveaway

*fingers-crossed*


Tuesday, November 22, 2011

Contact Lenses - Living With It!

No, not a sponsored post by the brands about to be mentioned whatsoever.

I picked up an Acuvue booklet from Focus Point last week and it's a "First-Time Contact Lens User Guide". I thought it'd be pretty fun to share some advice/tips that I read where make-up and lenses are concerned.


~LIVING WITH CONTACT LENSES - Make-Up and Lenses ~
---------------------------------------------------------------------------------------------------------------
ONE:      Put your lenses in before you put on your make-up.
(Erm... well, I do that... sometimes. :P)


TWO:     Apply eyeshadow and liner gently, so you don't jostle or damage your lenses.
(Yes, very good advice. You don't want your lenses tearing up in your eye now, do you?)


THREE:     Use oil-free and fragrance-free eye make-up.
(Most of my make-up are oil-free and fragrance-free. So, that's good.)


FOUR:     Use water-resistant mascara and eyeliner to prevent flaking and smudging.
(Oh, yes! Especially if your eyes tear-up easily. Water-proof/water-resistant make-up is necessary!)


FIVE:     Remove your lenses before your remove your eye make-up.
(This is so important, people! And, always always always remove your make-up before going to bed!)


And here's a professional tip (...from the booklet, of course. I am no eye specialist...) :

20/20/20 BREAK RULE:     
Every 20 minutes, rest your eye for 20 seconds by looking at a distant object at least 20 feet away.

--------------------------------------------------

Cool? So, are all you users of lenses doing the above? Do share!
I am off to rest my eyes for 20 seconds.

Till then...

(Haha! I am probably going to take 2000 seconds... well, it's nap time! :D)


Wednesday, September 21, 2011

EOTD 03 : Bright Greens


~ " Green is the best color in the whole wide world! " ~ Elaine Chin

_________________________________________________________________

The above shows my quote of the day. :)

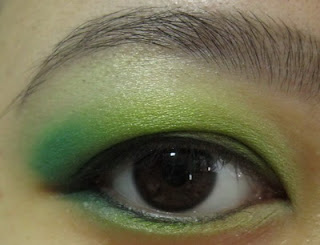
Here's a quick eye look that I put together today. Only three eyeshadow colors for the lid and brows. 


Easy-peasy!


Eyes
NYX Jumbo Eyeshadow Pencil in Rocky Mountain Green
Elianto Vibrant Shadow in Jewellery Green, Young Lemon and Ivory Black

Jewellery Green, Young Lemon, Ivory Black


1) Apply a green base (NYX Jumbo Eyeshadow Pencil in Rocky Mountain Greenall over the lid area, a little passed the crease.
2) Place a bright green (Elianto Young Lemon) on the lid area where the base was applied earlier, leaving the outer corner untouched.
3) Now, use a deeper green (Elianto Jewellery Green) on the outer corner and blend it in with the bright green.
4) Use a black eyeshadow (Elianto Ivory Black) to line the eyes and to lightly fill in the brows.


Photos taken with flash.


Photos taken without flash in normal daylight.


This look is great for hooded lids as well! The color still peeks through!


And here are both eyes, one all made up and the other as bare as it can be. Hahaha!


Till the next post... 


Monday, September 5, 2011

Part Two: Brush Roll Review


I am back, everyone! Thank you for dropping by my blog. Do not forget to leave a comment. That would be much appreciated. :)


If you have missed out Part One, click here!


10) Angled Flat Eyeshadow Brush (three of them)
Great for placing eyeshadow at the outer-V area of the eye. Good for blending out eyeshadow at the crease as well. I have three of them in this brush roll. One can never have too many brushes like this. 
Verdict : YAY


------------------------------


11) Pencil Eyeshadow Brush
One of my favorite kind of brushes! I really like pencil brushes. The pointy tip makes precise eyeshadow application an ease especially for crease work or lash lines. I definitely want more pencil brushes. This brush is really soft but stiff enough to smudge out eyeliners.
Verdict : YAY


------------------------------


12) Angled Blush Brush
You will see that this brush and the one mentioned after this looks pretty similar. The reason I picked this brush as a blush brush because it is much softer and it does not give that much precision as I would like for contouring. But, I wish the brush head was a little bigger so that blending color on the cheeks would be easier as it would cover more area on the cheeks. 
Verdict : NAY


------------------------------


13) Angled Contour Brush
If only the blush brush mentioned above had the size just like this contour brush. This is stiffer and bigger and great for contour, in my opinion. It gives precision when blending a darker-than-my-skin-tone powder onto contour areas such as the temples of my forehead, under the cheekbones and the jawline. The bristles are not too dense therefore it won't pick up too much color. 
Verdict : YAY


------------------------------


14) Face Powder Brush (two of them)
For the face, my favorite kind of brush is the powder brush and the one that comes in this brush roll is no exception. It is one of my favorites because it is big and soft and feels great on the face. I prefer using powder brushes over powder puffs for reasons of hygiene. Do check out the Etude House powder brush because that is simply awesome! This comes second. :)
Verdict : YAY


------------------------------


15) Fan Powder Brush
Definitely the biggest brush in the roll. This fan brush is huge! It is spanned out really wide and covers a good area on the face while powdering. Bristles are very soft and it feels great on the face. I am new to fan brushes but this one is slowly growing on me. It might become my favorite face brush soon. 
Verdict : YAY


------------------------------


16) Fan Blush Brush
A smaller, thinner and sparser fan brush compared to the one above. Because of how sparse this brush is, it tends to get out of shape pretty easily. I have tried it on as a blush brush and it does pick up a good amount of color, just right for the cheeks for application but that is just as good as it gets. Do not rely on this brush to blend out your blush because the bristles are just not thick enough. I definitely prefer the conventional blush brush.
Verdict : NAY


------------------------------


That wraps up my brush roll review on all 24 brushes (some brushes are similar). Once again, bear in mind that this is how I PERSONALLY USE the brushes that come in different shapes and sizes. Thank you all for reading. Do not forget to leave a comment! 

Till then...


Thursday, June 16, 2011

My Mini M.A.C Collection (edited)


I have several M.A.C (Make-up Art Cosmetics) items - some of which were given by very dear friends, but mostly purchased with my own money. M.A.C is in my 'pricey' or 'high-end' list of brands therefore I only purchase items I really want and which I think is worth my money. I definitely do my research online by reading reviews before purchasing an item. Overall, I think M.A.C is indeed a very good cosmetics brand and if I had a little more money, I definitely would not mind getting more products to slowly grow my personal M.A.C collection (am currently lusting the eyeshadows! gahhh!).

Anyways, here goes. :)


1) LIPS
M.A.C lipglosses are vanilla-scented which I really like. M.A.C carries several types of lipglosses such as the standard lipglass to plushglass and etc. Do check out their official website for a more detailed description of each type. 

L-R : 
(a) Tricolor Lipglass in SIMPLY DELICIOUS (sheer coral-red) - thank you MESHUGA!
(b) Lipglass in VIVA GLAM GAGA (semi-opaque cool-toned pink)
(c) Cremesheen Glass in FASHION SCOOP (sheer baby pink)
(d) Dazzleglass in VIA VENETO (shimmery purple with blue glitter)
(e) Plushglass in NICE BUZZ (shimmery champagne)


L-R: Simply Delicious, Viva Glam Gaga, Fashion Scoop, Via Veneto, Nice Buzz


2) FACE
I absolutely love M.A.C blushes. They have a great selection of colors and the blushes are long-lasting. The blushes come in a rather large pan size. Although I purchased these three over a year ago and use them relatively much, I have yet to hit pan! Great value, eh! Oh, definitely use a light-hand when applying M.A.C blushes because they are highly pigmented. Just see the pictures below. Va-va-voom bright!

L-R: 
(a) Sheertone blush in PINCH O' PEACH (matte mauve-pink) - thank you MESHUGA!
(b) Sheertone blush in INSTANT CHIC (matte coral-peach)
(c) Blush Ombre in RIPE PEACH 
     This blush is a gradient of shimmery orange to a matte coral-red (see blush pan).
     The middle swatch below is the bottom part of the pan which is the matte coral-red
     The fourth swatch below is the middle part of the pan which is a perfect coral.
     The last swatch below is the top part of the pan which is a shimmery orange.


L-R: Pinch O' Peach, Instant Chic, Ripe Peach


3) EYES
I own two cream eyeliners that come in pots. These eyeliners have a very smooth texture, great color pay-off and long-lasting power on my semi-oily lids.

BLACKTRACK is a matte black and RICH GROUND is a shimmery reddish brown.


I have a M.A.C Paint Pot in CORAL CREPE which is a deep coral eyeshadow base that is used before powder eyeshadow application. The paint pot will prevent creasing on lids and also enhance the eyeshadow color. Another base I own is the M.A.C Cream Color Base in SHELL which is a frosty pink-beige which can be used either on the eyes as a base or cheekbones as highlight. Finally, two M.A.C pigments - MELON (shimmery copper gold) and SHIMMERTIME (shimmery baby pink) are loose colored powder that I use as eyeshadows. These two shades or gorgeous! Check out the swatches below.

L-R: Coral Crepe, Shell, Melon (top-right), Shimmertime (bottom-right)
Paint Pot in Coral Crepe

Cream Color Base in Shell
L-R: Melon and Shimmertime (I forgot to take individual pictures of these pigments. Sorry!)


That is it for my mini M.A.C collection. No intention of expanding it just yet. Haha! But when I do, that will be another blog post.

Till then...


EDIT: I missed out on one more item - the M.A.C Powerpoint Pencil in PERMAPLUM. It is a pencil eyeliner that is a deep plum color. Perfect for days that you won't want to go totally black but something dark enough to enhance the eyes. This pencil eyeliner was a gift with purchase.


Saturday, June 11, 2011

Part One : Brush Roll Review


Sorry this post took so long! I had to individually take pictures of every brush, edit the photos and actually use the brushes. Because the roll has 24 brushes, I decided to blog in two separate posts. Take note that all brushes were washed with MAC's Brush Cleaner twice before usage. (Always always wash new brushes to rid the dye and dirt.)


First picture shows the head of all 24 brushes. These 24 include eyes, lips, and face brushes. Very pretty eh!


Now, short individual write-ups of each brush. Brushes are self-named by me according to how I use them. :)


1) Eyebrow Brush & Mascara Comb 
Pretty standard brush, I'd say. The eyebrow brush has solid bristles but aren't scratchy when combing through the eyebrows. The mascara comb, however, is not very practical. The teeth are too wide to evenly comb out and separate eyelashes. I use the steel mascara comb which I blogged about in my last post.
Verdict : Eyebrow brush - YAY and mascara comb - NAY!


------------------------------


2) Mascara Spoolie Brush
Another standard brush. Well-sized. Bristles are very soft, much to my surprise. I love how the spoolie is slightly angled as well. I really love mascara spoolie brushes. I use them for my eyebrows and eyelashes. They do wonders!
Verdict : YAY


------------------------------


3) Sponge-Tip Applicator
I never fancied sponge-tip applicators that come in a proper looking handle. To me, sponge-tip applicators are meant to be disposed after several uses. Why, you ask? The color build-up, they wear off (rubbery-sponge tears off) and are not very wash-friendly. This one is no exception. So, I definitely prefer my disposable sponge-tip applicators rather than the proper ones. The quality of this applicator is decent - rubbery sponge on a flexible head.
Verdict : NAY


------------------------------


4) Fine Eyeliner Brush
I was excited for this brush as I don't own anything like it and was eager to use this brush with my gel/cream eyeliners. The picture shows how sharp and pointed the brush is. Well, do not let the picture fool you! After my first dip into the gel eyeliner, the brush hairs splayed and was totally flimsy. Application was such a hassle because the brush is too soft to draw a line. This brush gave absolutely no precision for eyeliner application. Such a disappointment.
Verdict : NAY 


------------------------------


5) Lip Brush
My first proper lip brush. I have a tiny lip brush given to me by Anna some time ago but that is more appropriate for travelling for the size it comes in. This brush is very soft but it's stiff enough to apply lip color. What I do is, after using a lipliner, I will use the brush to pick up some lipstick and then fill in the lips. I sometimes use the brush to apply lipgloss as well. I use a lip brush mainly to keep my lipstick/lipgloss clean (hygiene purposes) and not so much for precise application. (I can never put on lipstick/lipgloss straight from the tube especially right after a meal. Ergh.)
Verdict : YAY


------------------------------


6) Angled Eyebrow Brush
Perfect for filling in eyebrows with eyeshadow. The angle makes it easy to line the brows before filling it in completely. Brush hairs are very soft. 
Verdict : YAY


------------------------------


7) Curved Eyeliner Brush
Very comparable to my other curved eyeliner brush from Etude House (that's my absolute favorite brush for gel/cream eyeliners) in terms of the shape of the brush. This one is slightly more dense therefore it draws a thicker line on the eyes. Nevertheless, still a good eyeliner brush.
Verdict : YAY


------------------------------


8) Angled Eyeliner Brush
Also very comparable to an angled eyeliner brush from Etude House. This brush is very thin, makes drawing a precised line fairly easy with gel/cream liners. I do use this brush when lining my eyes with eyeshadow as well. 
Verdict : YAY


------------------------------


9) Round Flat Eyeshadow Brush (six of them)
This brush roll is definitely for someone like me who does not like to wash brushes often. It carries SIX round flat eyeshadow brushes. Haha! I can never have too many eyeshadow brushes as I use many different eyeshadow colors from time to time. I use these brushes to pat on color on the eyelid area. These six brushes are split into two sizes - 8mm and 10mm. The pictures might show you a different thing but trust me, I have three small round flat eyeshadow brushes and three more that are slightly bigger. The brushes are soft but it takes slightly more effort to get the eyeshadow color on to the brushes because they are not very dense. 
Verdict : NAY


------------------------------


To be continued in the next post ...

10) Angled Flat Eyeshadow Brush (three of them)
11) Pencil Eyeshadow Brush
12) Angled Blush Brush 
13) Angled Contour Brush
14) Face Powder Brush (two of them)
15) Fan Powder Brush
16) Fan Blush Brush

Edit: Part Two is up! Click here.